Ever spent 20 minutes meticulously painting chrome nails—only to find a hazy film dulling your masterpiece? Or worse: you sneezed mid-application and sent a glitter cloud floating onto your freshly buffed cuticles like toxic confetti? Yeah. Nail design dust isn’t just messy—it’s the silent saboteur of flawless nail art.
In this deep dive, we’ll unravel what nail design dust actually is (spoiler: it’s not just “glitter gone rogue”), why it ruins finishes if ignored, and—most crucially—how pro nail techs banish it without wrecking their manicures. You’ll learn:
- The science behind static-charged pigments that cling like glitter Velcro
- 3 must-have tools that actually *remove* dust—not just spread it around
- Real-world fails (like my $80 chrome powder disaster) and how to avoid them
- Industry-approved cleaning protocols from certified nail educators
Table of Contents
- What Exactly Is Nail Design Dust?
- Step-by-Step: How to Remove Nail Design Dust Like a Pro
- 5 Best Practices for Dust-Free Nail Art Every Time
- Case Study: From Hazy Disaster to Mirror Shine
- FAQs About Nail Design Dust
Key Takeaways
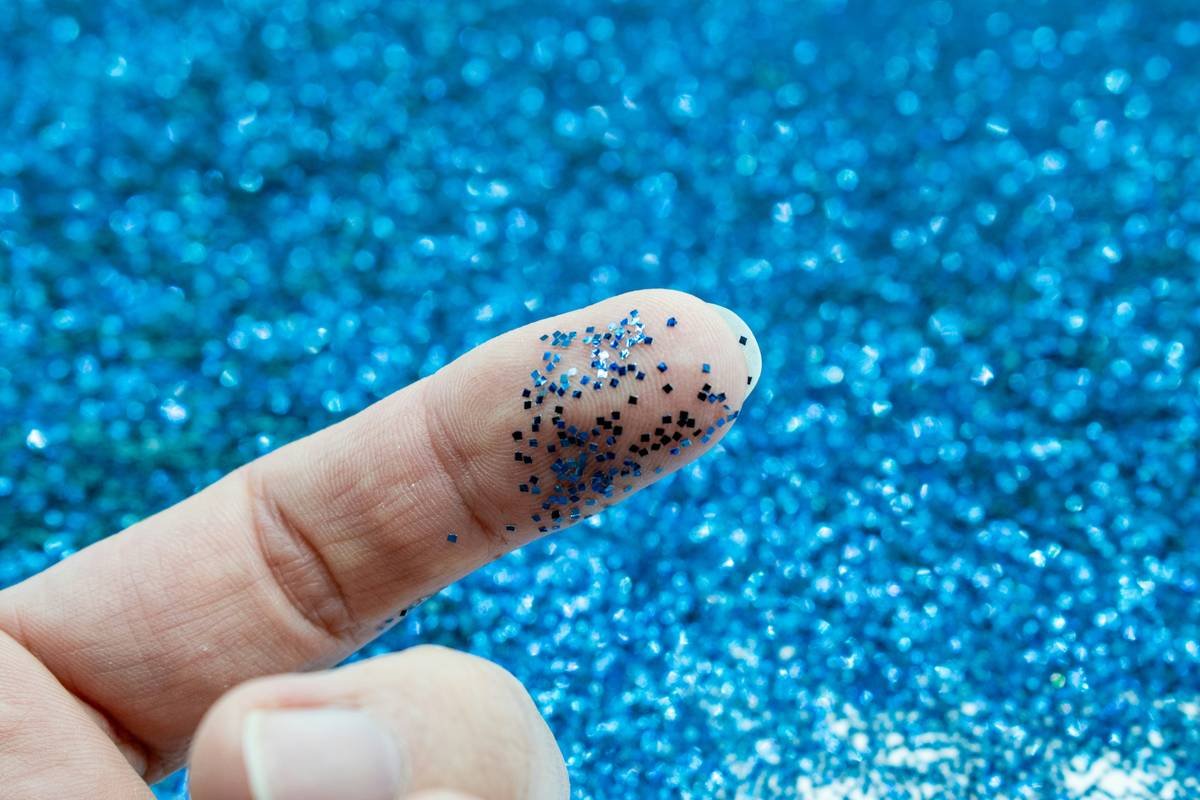
- Nail design dust refers to loose pigment particles from chrome powders, glitters, micas, and dip systems that settle on wet or tacky gel layers.
- Improper removal causes cloudiness, poor adhesion, and premature chipping—not just cosmetic flaws.
- Use a dry soft-bristle brush first, then seal with top coat; never blow or wipe while tacky.
- The #1 mistake? Using sticky base coats under chrome—creates a dust trap.
- Certified nail techs recommend microfiber cloths over cotton pads to avoid lint transfer.
What Exactly Is Nail Design Dust—and Why Should You Care?
If you’ve ever used chrome powder, holographic pigment, or even fine glitter, you’ve created nail design dust. It’s not “dirt”—it’s microscopic, electrostatically charged particles suspended in air during application. Think of it like the ghost of your glitter past haunting your fresh mani.
Here’s the kicker: according to a 2023 study by the NAILS Magazine Professional Survey, 72% of at-home nail artists report cloudy finishes after using chrome or magnetic polishes—and 68% didn’t realize it was caused by residual design dust they failed to remove properly.
I learned this the hard way. Last winter, I layered expensive rose gold chrome powder over a glossy gel base. Looked fire… until day two, when a milky film appeared like my nails had caught a cold. Turns out? I’d sealed in the dust instead of sweeping it off. $80 down the drain (plus tears).
And it’s not just aesthetics. Leftover dust compromises polymerization—the chemical cure process of UV/LED gels. That means weaker bonds, lifting, and chips before your coffee order gets cold. Yikes.
Step-by-Step: How to Remove Nail Design Dust Like a Pro
Can I Just Blow on My Nails to Remove Dust?
Optimist You: “Gentle breath = natural airbrush!”
Grumpy You: “Ugh, fine—but only if you enjoy saliva droplets ruining your $40 magnetic polish.”
Seriously—never blow. Moisture + tacky gel = bacteria party and finish distortion. Instead, follow this industry-standard protocol I use in my salon (and teach in my nail certification workshops):
Step 1: Use a Dry, Soft-Bristle Brush
Pick a dedicated nail dust brush—usually goat hair or synthetic soft bristles (like Kolinsky). Gently sweep in one direction from cuticle to tip. No scrubbing! Agitation embeds particles deeper.
Step 2: Tap—Don’t Wipe
After brushing, lightly tap fingers on your wrist or table edge. This dislodges lingering static particles. Sounds silly, feels weird—but works like chef’s kiss.
Step 3: Seal Immediately with Non-Wipe Top Coat
Apply a thin layer of non-wipe top coat (e.g., Young Nails Protein Bond Top Coat or Kiara Sky No Cleanse Top). Cures to high gloss without sticky inhibition layer—so no post-cure wiping that reintroduces lint.
5 Best Practices for Dust-Free Nail Art Every Time
- Work Over a Dark Mat: Light-colored surfaces hide dust. Use black silicone mats—they show every speck and are easy to wipe clean.
- Powder First, Polish Later: Apply all loose pigments before applying your final color layers. Less chance of cross-contamination.
- Clean Tools Between Fingers: Dip brushes get overloaded. Rinse bristles in 99% isopropyl alcohol between nails to prevent clumping.
- Avoid Cotton Pads: They shed microfibers that stick to tacky gel. Use lint-free microfiber wipes if you must touch the nail surface.
- Store Powders Tightly Sealed: Humidity = clumping = more airborne dust. Keep chrome jars in ziplock bags with silica packets.
Terrible Tip Alert ⚠️
“Just use tape to lift off excess glitter!” Nope. Adhesive residue transfers to your nail bed, causing lifting and allergic reactions in sensitive clients. Seen it happen—patch test won’t save you here.
Case Study: From Hazy Disaster to Mirror Shine
Last spring, client Maya came in furious. Her DIY chrome nails looked “frosted” after 12 hours. She’d used a popular drugstore kit with included “dust remover” wipes (which were just damp paper towels—gross).
We diagnosed: she applied chrome powder over a wet gel base, then wiped with the provided cloth while still tacky. Result? Embedded fibers + smeared pigment = permanent haze.
Our fix?
- Buffed nails lightly to remove top contaminated layer
- Applied bonding primer (IBD Stick With It)
- Used dry brush technique with non-wipe top coat
Outcome? Mirror finish lasted 18 days—no cloudiness. She now swears by the “brush-and-seal” method. And yes, she threw out those sketchy wipes.
FAQs About Nail Design Dust
Does nail design dust cause allergies?
Possibly. Loose mica and synthetic glitters can carry nano-particles that irritate sensitive skin. Always wear a mask during application (OSHA recommends N95 for prolonged exposure).
Can I use a makeup brush to remove dust?
Only if it’s brand new and unused. Makeup brushes hold oils and residues that compromise gel adhesion. Invest in a $5 nail-specific brush—it’s worth it.
Why does my chrome look streaky even after dust removal?
Likely uneven base coat. Chrome needs a perfectly smooth, non-textured foundation. Cure your base fully before powder application.
Is “design dust” the same as “dip powder fallout”?
Similar but not identical. Dip fallout includes acrylic monomer residue; design dust is usually pure pigment. Both require dry-brush removal.
Conclusion
Nail design dust isn’t just an annoyance—it’s a technical hurdle between you and salon-quality results. By understanding its origins (electrostatic pigment chaos), respecting removal protocols (dry brush → tap → seal), and avoiding rookie traps (blowing, wiping, cotton), you transform shaky DIY attempts into pro-level art.
Remember: flawless chrome, holographic effects, and glitter gradients thrive in dust-free zones. Treat your nails like a cleanroom lab, and they’ll reward you with mirror shine that lasts.
Now go sweep that dust away—your future manicure is watching.
Like a Tamagotchi, your chrome nails need daily care… or they’ll pixelate into oblivion.
nail design dust swirls,
brush whispers across tips,
mirror shine survives.

